
Shooting settings
Taking photos
-

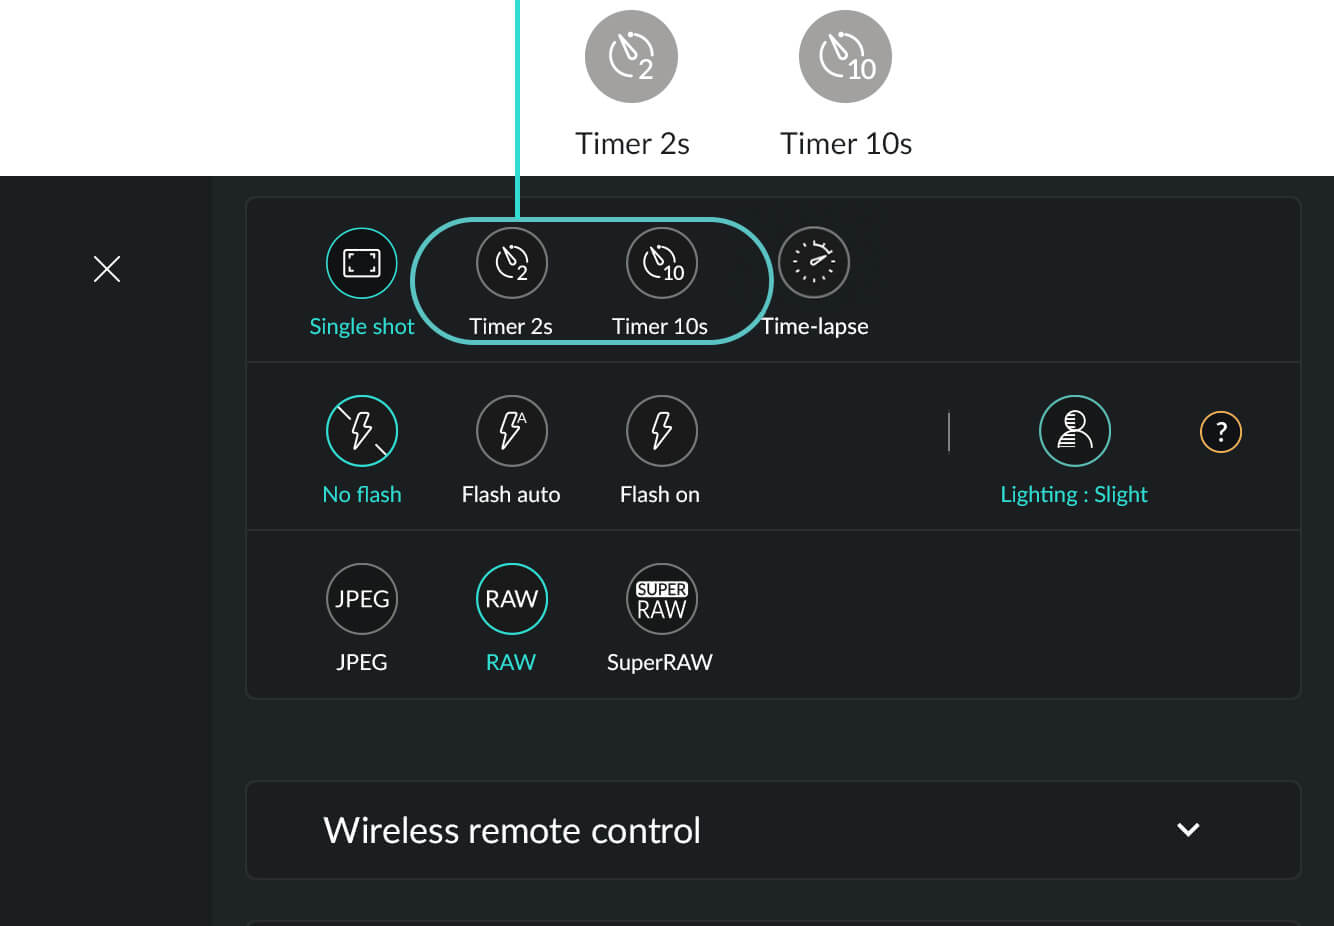
Timer
The DxO ONE timer lets you set the camera to take a photo either two or 10 seconds after pressing the shutter button.
The “2s Timer” setting lets you avoid camera shake when using slow shutter speeds, such as when the camera is mounted on a tripod, for example.
The “10s Timer” setting is useful when you’re taking a group photo and want to be in the shot as well!
Tap the Shooting settings icon in the top right-hand corner of the screen. In the first row of the Shooting settings menu, tap the 2s or 10s Timer icon.

The selected time will start counting down and will be displayed on the iPhone’s screen.

At the end of the countdown, the shutter will open and the photo will be taken.
-

Flash
-
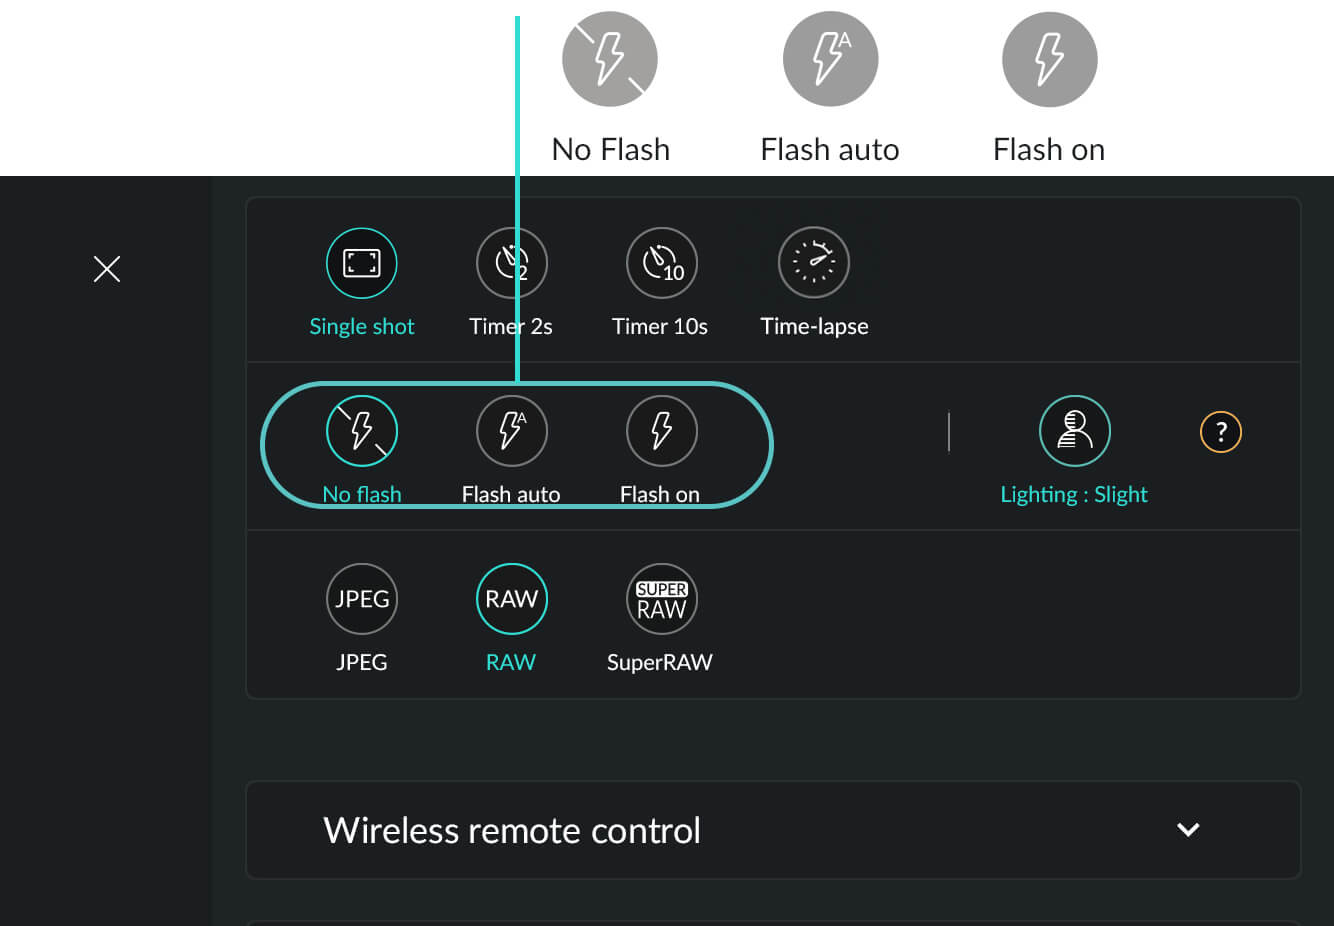
 Flash off: the flash is disabled.
-
Auto flash: the flash automatically turns on if the lighting conditions are dark enough.
-
Flash on: the flash turns on for every shot.
In Auto flash and Flash on modes, an icon is displayed on the right of the capture screen to remind you. Remove the flash and revert to default mode by tapping the icon (“Flash off”).
Because iPads do not have a built-in flash, there is no flash function for the DxO ONE when it is used with an iPad.
iPhones do have a flash. Make sure you are not blocking the flash with your fingers as you hold the iPhone. To ensure the flash lights the subject correctly, the DxO ONE must not be rotated (in relation to the iPhone) when using the flash.
-

Exposure compensation
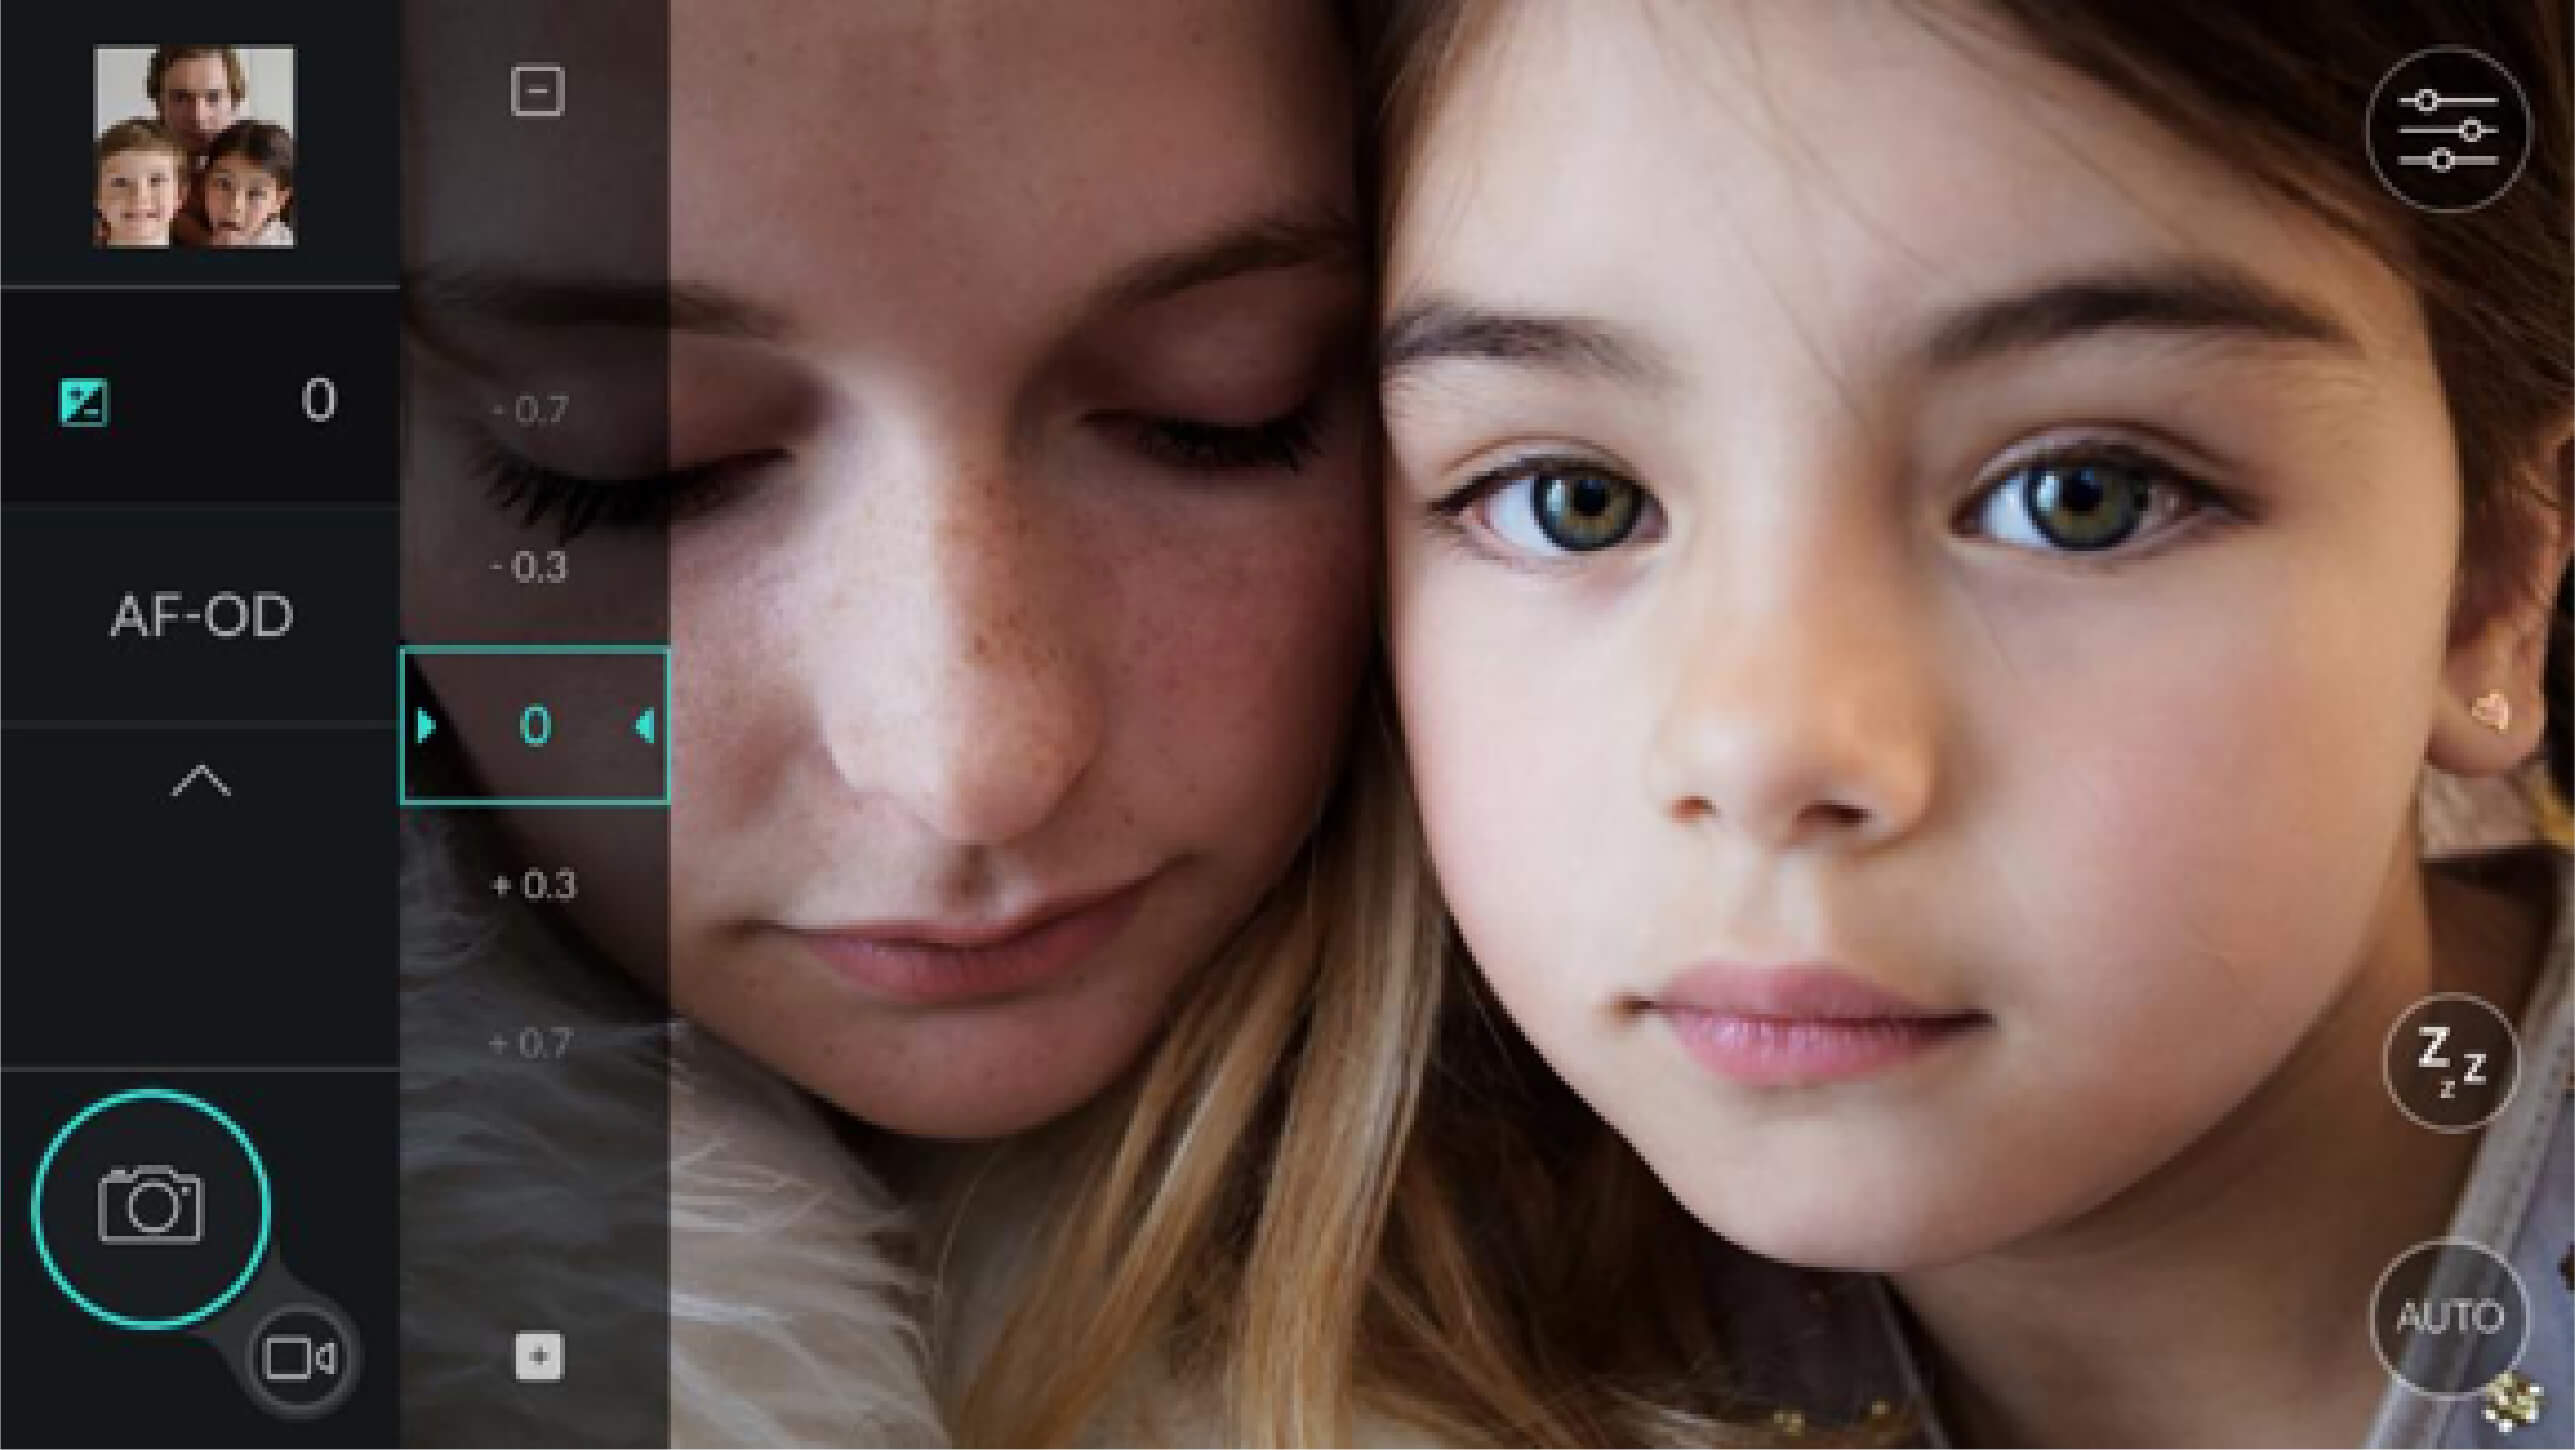
The exposure compensation is available in all the modes except Manual (M) mode and lets you darken or lighten a photo on the fly. This feature does so by modifying the exposure settings the camera is allowed to modify (shutter speed and sensitivity in A mode, aperture and sensitivity in S mode, and all settings in the other modes).
The exposure compensation range extends from −3 EV to +3 EV in increments of 0.3 EV.
Exposure compensation has multiple applications in photography. It lets you reveal detail when your subject is backlit, recover details in snow or on water, and maintain a dark atmosphere when shooting at dusk. The 0.3 EV stops give you very precise control over the image’s brightness.
-

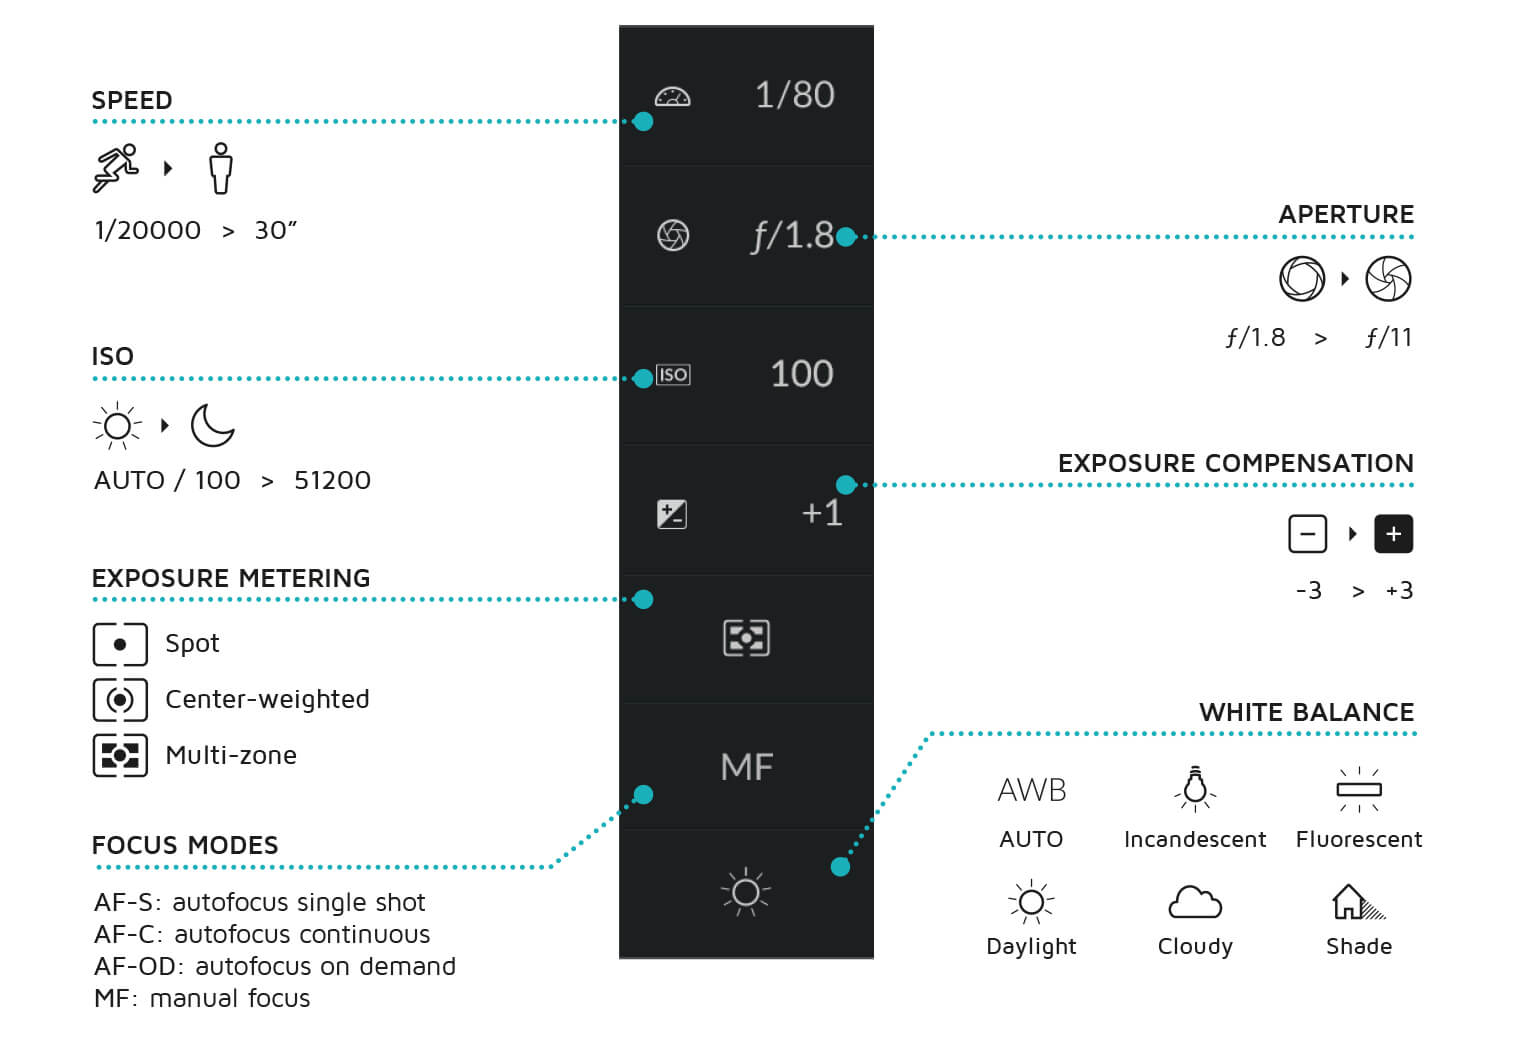
Advanced mode settings
In advanced modes (P, A, S, and M), in addition to exposure compensation, the settings panel includes a certain number of additional settings that are not accessible when using the scene modes:
-
Exposure settings, which interact with each other: shutter speed, aperture, and sensitivity.
-
Metering modes, i.e. the way the DxO ONE measures the light.
-
Focus modes, which let you produce a sharp image.
-
White balance, which lets you obtain an image with natural colors and rendering irrespective of the lighting method or the light source used for the scene.
-

Exposure triangle
In photography, exposure describes a photo’s brightness. A correctly exposed photo is neither too dark, nor too light. A photo that is too light is said to be “over-exposed.” A photo that’s too dark is called “under-exposed.”
Exposure is controlled using three settings: aperture, shutter speed, and ISO sensitivity. These three settings form what is called the exposure triangle, and each setting affects the amount of light the camera captures. Each of them also influences other aspects of the image, including depth of field, motion blur, and digital noise.
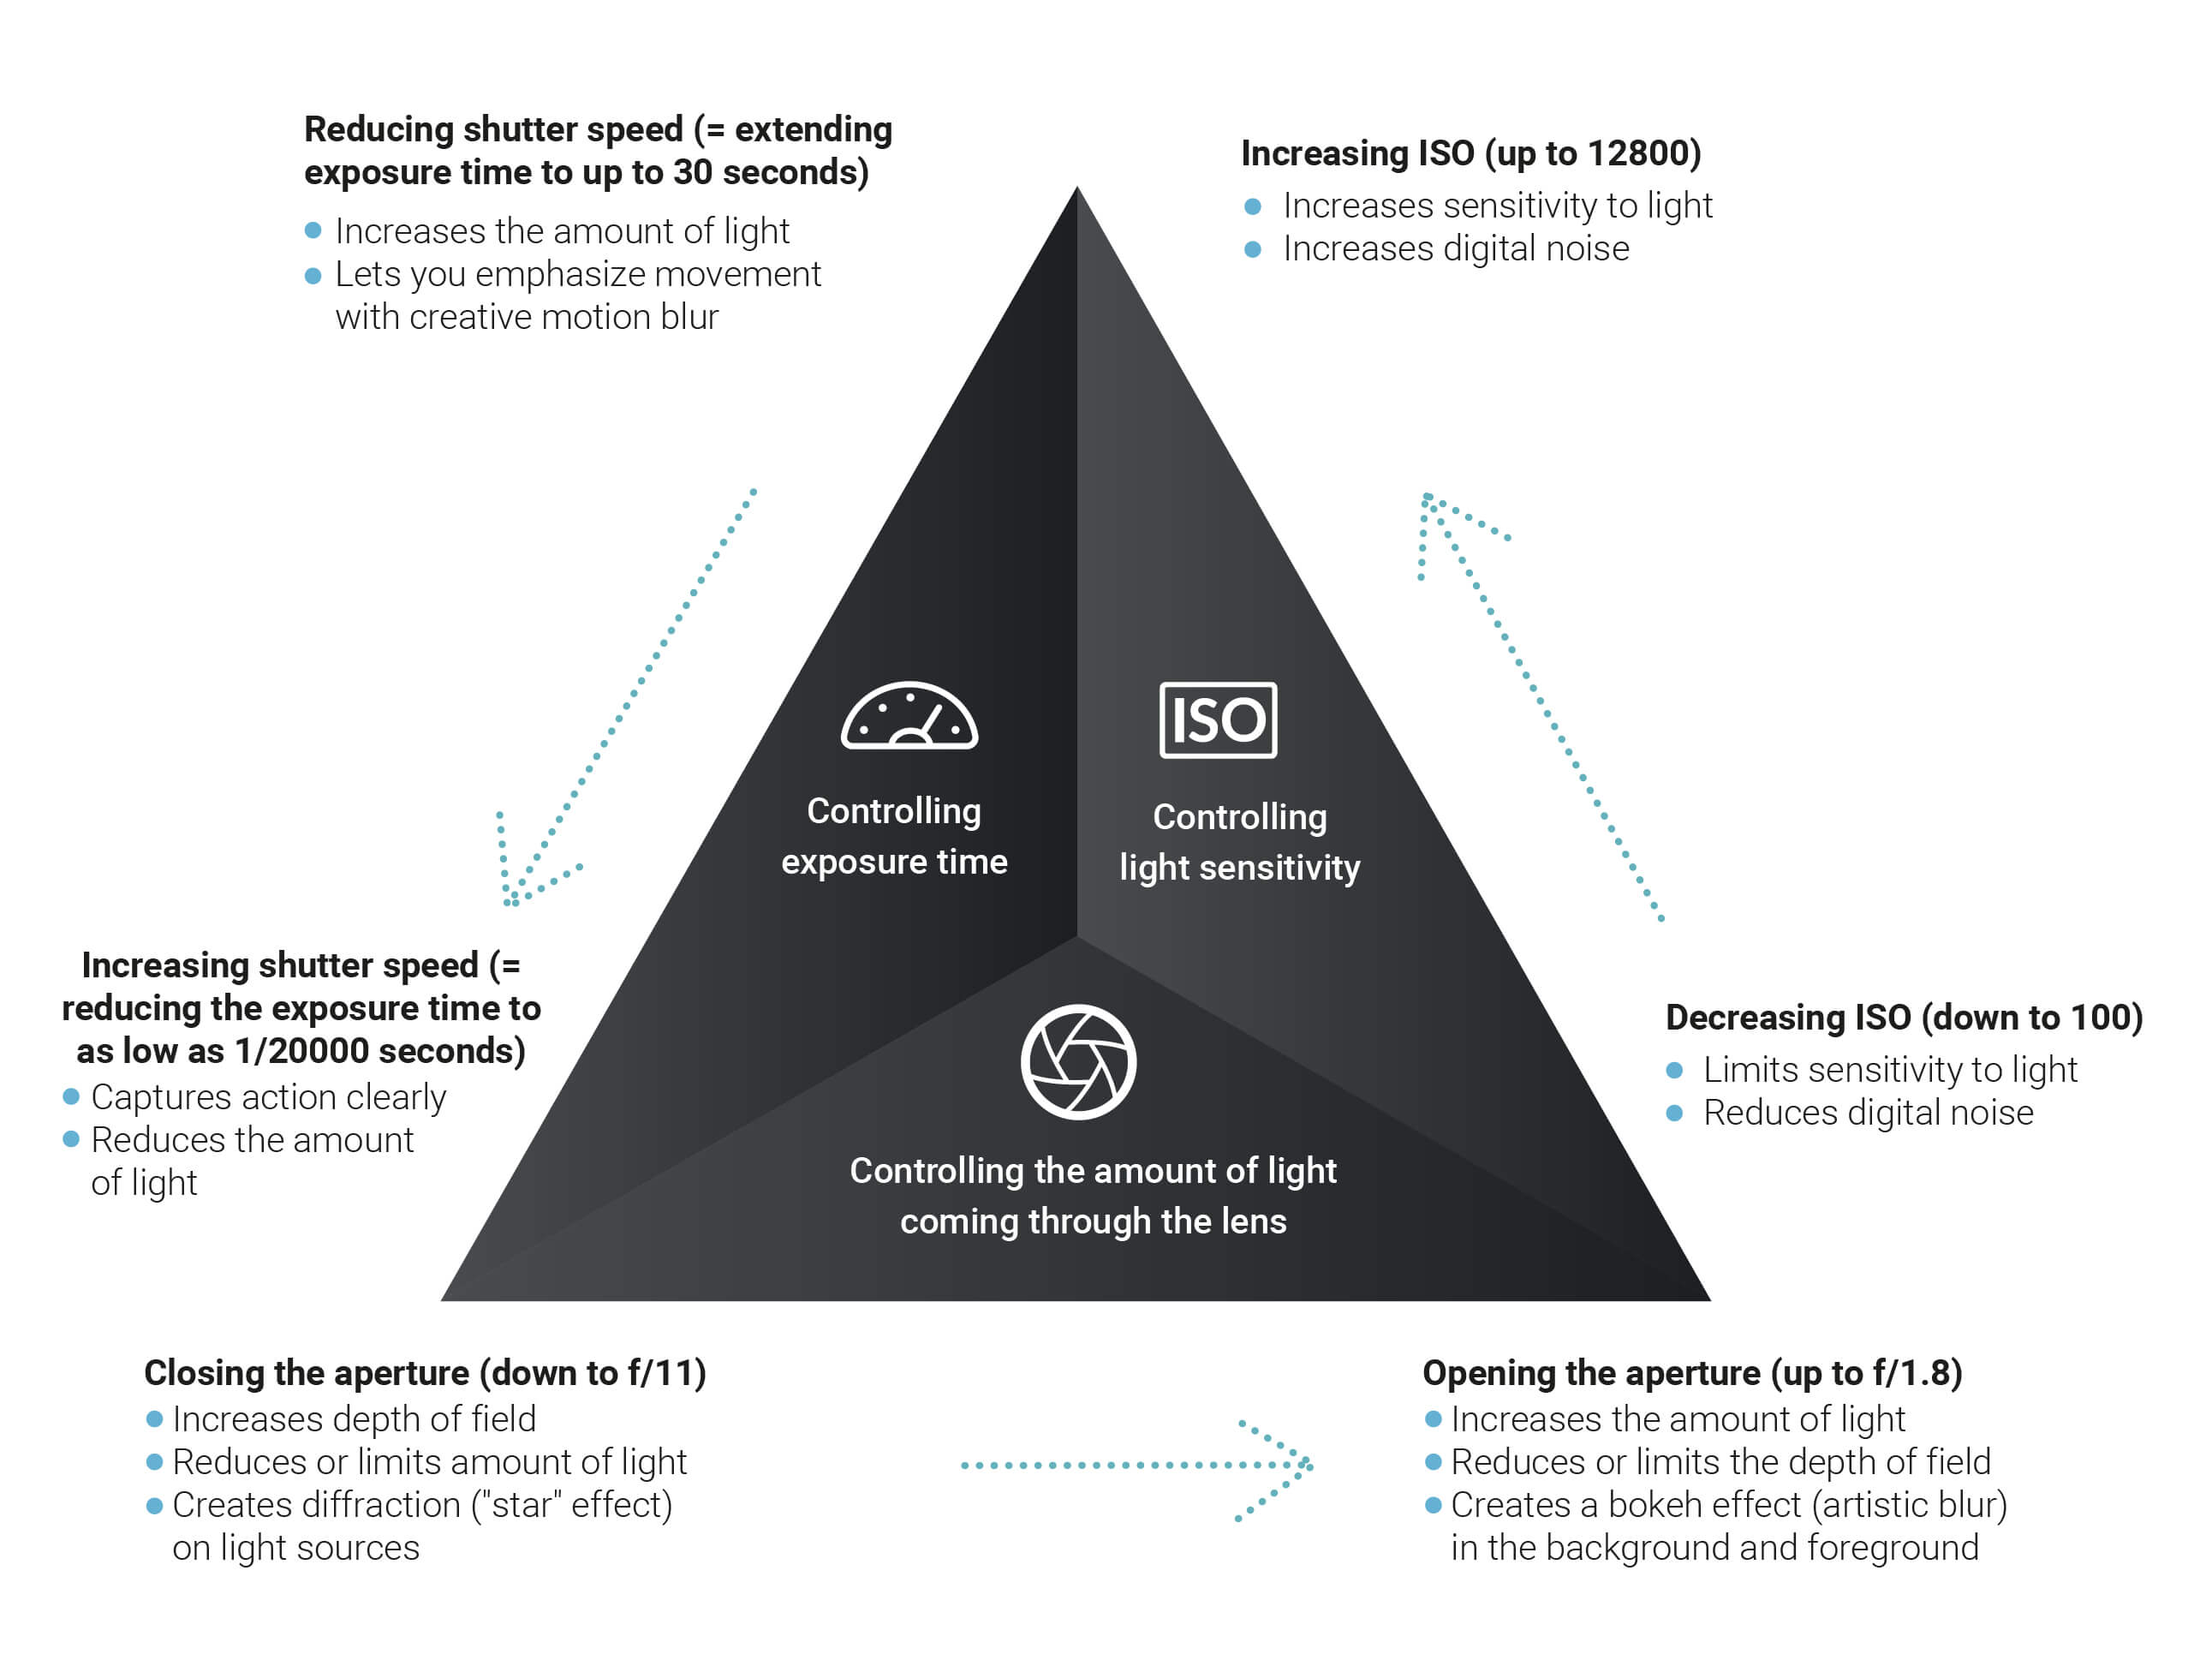
Choosing the right value for each of the three exposure settings is a complex operation, as it requires a number of factors to be taken into account, including the ambient light level, the desired depth of field, the amount of movement generated by the scene and the photographer and the desired level of blur, the digital noise level, etc.
In Auto mode (see section “Scene modes”) and the scene modes (section “Les modes Scene”), your DxO ONE will automatically determine the correct exposure triangle, saving you from having to do the calculations necessary for choosing the correct settings.
In P mode (section “Advanced modes” ), your DxO ONE can automatically determine the correct exposure triangle, but you can also select your own ISO sensitivity and choose between different aperture/shutter speed combinations.
In the semi-automatic modes (A and S), the DxO ONE offers you control of one additional setting (aperture in A mode, shutter speed in S mode) and automatically calculates the correct values for the remaining settings.
Manual mode (M) gives you control of all exposure settings, but you can also let your DxO ONE select the appropriate ISO sensitivity setting for your aperture and shutter speed settings.
-

Aperture
Accessible in A (section “Advanced modes” ) and M (section,“Advanced modes” ) modes, the aperture setting lets you control the depth of field and regulate the amount of light entering the camera.

-
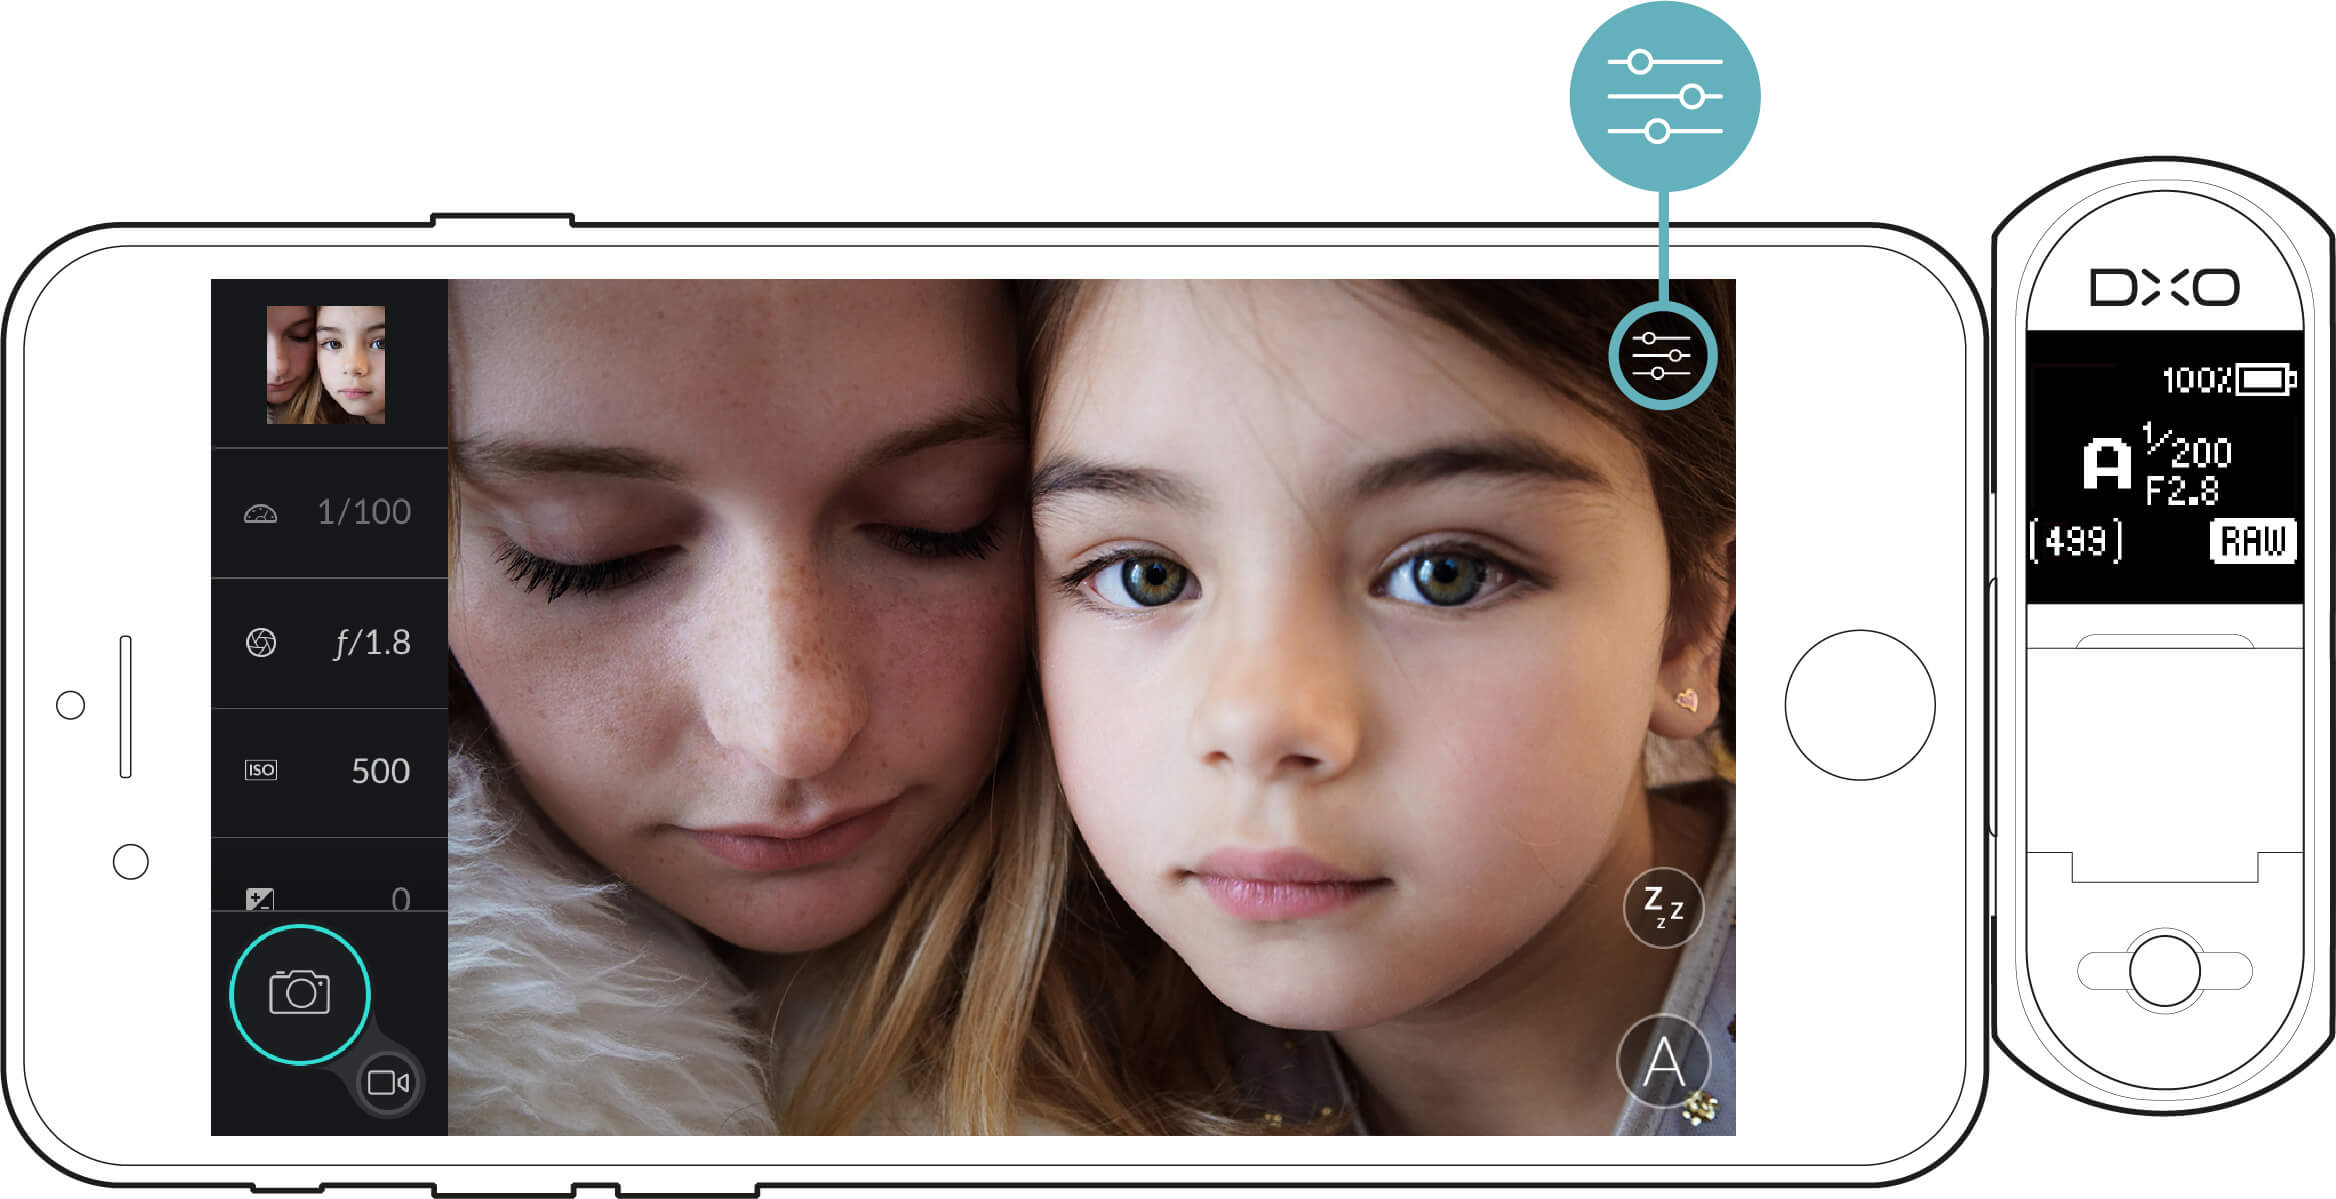
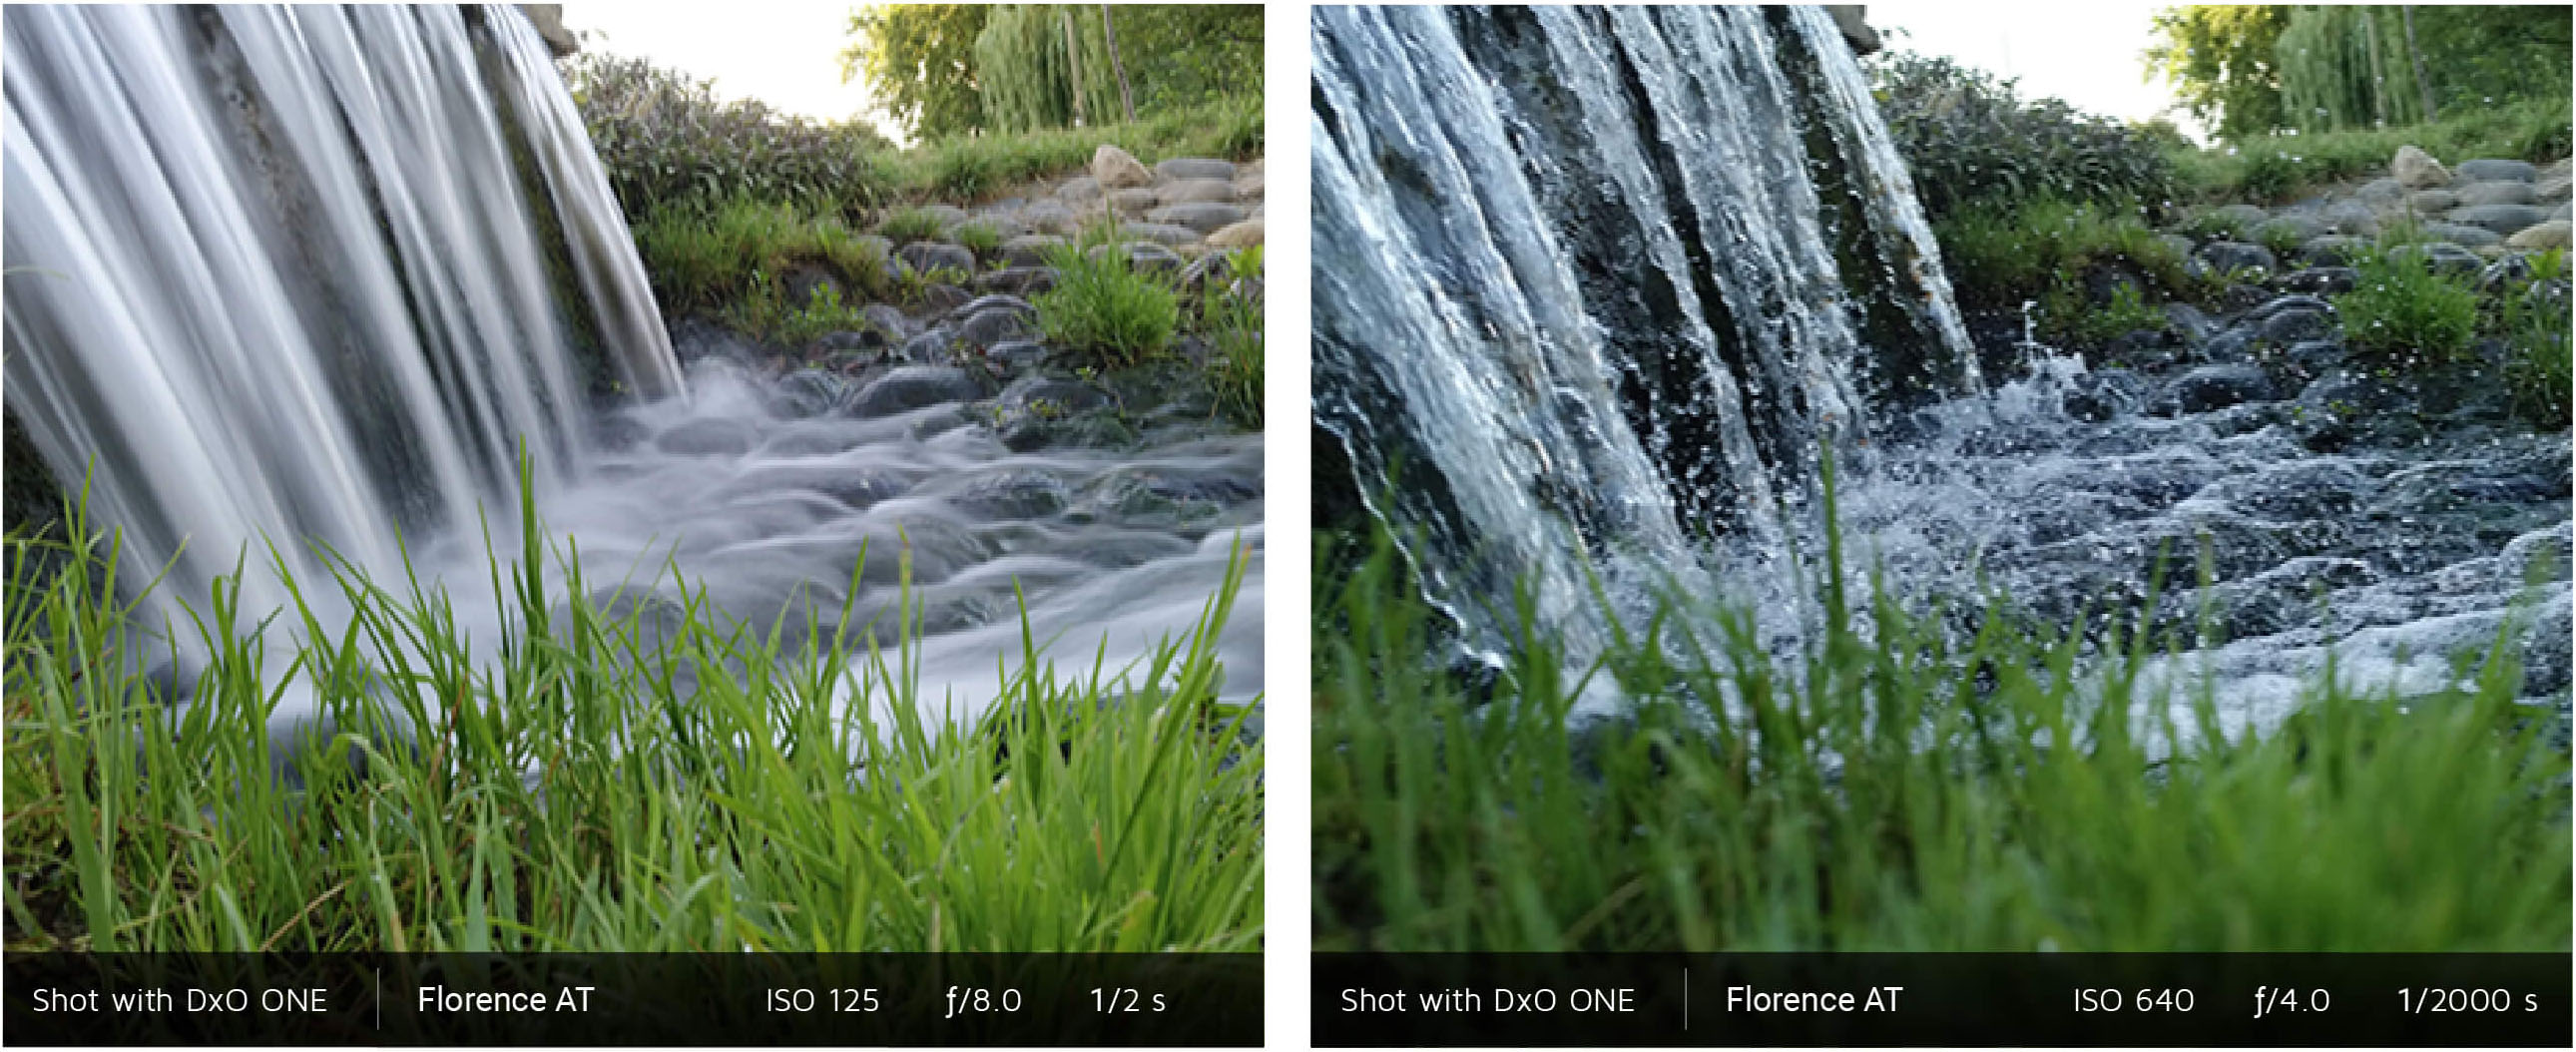
By opening the aperture (lower values, e.g. ƒ/1.8), you reduce the depth of field. When taking a portrait, this lets you bring out your subject with a beautifully blurred background (also referred to as bokeh), as shown in the left-hand photo. You will also let more light in, which allows a faster shutter speed; this in turn minimizes motion blur and reduces the ISO sensitivity to limit digital noise.
-
By stopping down (higher value, e.g. ƒ/11), you increase the depth of field and as a result extend the level of sharpness in the various planes of the image, as shown in the right-hand photo. However, less light will reach the sensor, which will reduce the shutter speed (increase the exposure time) and increase ISO sensitivity (and the digital noise).
Unless you want very slow shutter speeds or have specific requirements in terms of depth of field (macro photography, etc.), avoid stopping down beyond ƒ/5.6. At the narrower apertures, sharpness and hence image quality will be impaired due to diffraction, which causes light to scatter.
-
Shutter speed
Accessible in S & M modes (section “Advanced modes” ), the exposure time setting lets you deal with movement and regulate the amount of light captured by the DxO ONE.
To freeze movement, choose shutter speeds above 1/60 s (1/125 s, 1/250 s, etc.); for very fast movements, like the splashes created by this waterfall, select a shutter speed above 1/2,000 s. In this case, by shortening the exposure time, the camera captures less light, which can be compensated by either opening the aperture or increasing the ISO sensitivity – or both. This compensation will be done automatically in S mode, and will have to be done manually in M mode.
On the other hand, slower shutter speeds (1/15 s, 1/8 s, etc.) allow movement to appear in the image in the form of motion blur. However, below 1/30 s (1/15 s, 1/8 s, etc.) you run the risk of camera shake if you are holding the camera. Lengthening the exposure time increases the amount of light captured by the camera, which can be compensated by reducing the aperture or ISO sensitivity.
In strong ambient lighting, a slow shutter speed can lead to over-exposure, even at the minimum aperture and sensitivity. To take photos exhibiting motion blur in full daylight, filters can be added in order to reduce the amount of light entering the camera.
In artificial lighting, certain speeds can cause colored bands to appear in your images. In the S and M modes, a warning will appear at the top of the screen to prompt you to select a shutter speed that will avoid this effect. In the other modes, the DxO ONE automatically chooses a shutter speed that will avoid this phenomenon whenever possible.
In countries operating at 50 Hz (particularly in Europe), the compatible shutter speeds are 1/100 s, 1/50 s, followed by all speeds slower than 1/30 s (1/25 s, 1/20 s, etc.).
For countries operating at 60 Hz (particularly the United States), the compatible shutter speeds are 1/125 s, 1/60 s, followed by all speeds slower than 1/40 s.

At slow speeds, it’s best to release the shutter using the on-screen button, as it creates less vibration than the shutter button on the DxO ONE. Using the 2 s timer also reduces the risk of vibration.
-
ISO sensitivity
In all four P, A, S and M modes, (section “Advanced modes”), you can adjust the ISO sensitivity for your photo from this menu in one of two ways:
-
By selecting the Auto sensitivity mode, which will automatically select a sensitivity according to the brightness of the scene. This sensitivity can be limited via the “Maximum ISO value” option (see section “Shooting settings” for more details) in order to limit the loss of image quality. You can, for example, limit the maximum automatic sensitivity to 3,200 ISO.
-
By selecting a sensitivity value manually. In this case, the photo will be taken using your chosen sensitivity value (even if this is higher than the “Maximum ISO value”).
In both automatic mode and manual selection, the available sensitivity values range from 100 ISO to 25,600 ISO (Hi1) and 51,200 ISO (Hi2).
High ISO sensitivity (1600 ISO, 3200 ISO, etc.) produces a proper level of exposure even very low light conditions. This setting is useful in the evening or indoors and also lets you use a narrow aperture (large depth of field) or high shutter speed (freezing movement).
The highest sensitivity values produce digital noise, which appears as small dots or “snow” all over the image. For optimum quality, it’s best to use lower ISO sensitivity values (200 ISO, 400 ISO).
When using the high sensitivity values (Hi1 and Hi2), only RAW and SuperRAW files will actually be exposed at the requested sensitivity. JPEG files, which are especially used for previewing images on the iPhone, are limited to 12,800 ISO; as a result, they will appear darker than expected.
An order to limit the appearance of digital noise, we strongly advise you to use the SuperRAW format for shooting at these higher sensitivity values and to process the SuperRAW file using DxO computer software. For more information about the SuperRAW format, refer to section “File format and managing RAW files” .
If you choose a low sensitivity value, it is possible that a dark scene may not be correctly exposed. In the P, A, S modes, it’s best to display the advanced settings options on the screen so you can see the exposure indicator (see section “Shooting settings” for more details about displaying the advanced settings options).
The camera’s automatic selection feature may alter the sensitivity of the photo slightly to avoid flickering from the lighting conditions. For example, the photo might be taken at 320 ISO even though you selected 400 ISO. In general, however, the ISO sensitivity value used will remain as close as possible to the requested value to avoid creating digital noise and producing a lower-quality image.
-

Exposure metering
The DxO ONE offers three modes for light metering, each of which is designed to suit specific situations. You can also focus on metering the light for a particular element in the scene by tapping on it with your finger.
-
 Multi-zone metering:
this is the default mode. The DxO ONE will analyze the scene and measure the brightness levels of the various parts of the image, then weight them and calculate the appropriate exposure settings. Matrix metering also accounts for the presence of faces and highlights them over the background.
On the other hand, tapping on a part or element in the image will make it the dominant factor in the exposure metering process. -
 Center-weighted metering:
in this case, metering is performed over the whole scene, but the central part of the image becomes the dominate factor. In this mode, faces do not modify the exposure and are not taken into account. -
 Spot metering: exposure metering is performed only in a restricted zone covering approximately 6% of the image. This area is surrounded by a frame. You can move the frame by tapping on another point in the image, at which point the camera will also focus on this location.
Tapping on an element in the image will make it the dominant factor in the exposure metering process. In other words, the image’s exposure level will be adapted to the element selected, and the rest of the scene will become darker or lighter. In this case, you can use the exposure compensator to adjust the brightness of the rest of the image:
-
Backlit subject: by tapping on the subject, the figure will be lightened in order to be correctly exposed, but the background will be too bright. In this case, slightly under-expose the image by setting the exposure compensator to a negative value.
-
Landscape: if you focus on the sky, the ground will be too dark. Adjust the exposure compensator using a positive value to find the best compromise between the brightness of the ground and the sky.
-

White balance
The white balance makes it possible to compensate a color cast caused by a light source, for example a cold, bluish rendering in shade, or an excessively warm, orange rendering under incandescent lighting. This compensation makes it possible to give the image a more natural appearance and colors.
By default, the white balance is in automatic mode, but you can select another preset option from the left-hand toolbar by tapping on AWB and then scrolling through the options.
The various white-balance modes are:
-
 AWB (Auto White Balance): automatic white-balance that adapts to the light source or lighting in the image.
-
 Incandescent: for tungsten or halogen incandescent lighting. Compensates for a yellow/orange cast.
-
 Fluorescent: for lighting by fluorescent tubes and compact lamps. Compensates for a greenish cast.
-
 Daylight: for scenes in sunlight. Compensates for a warm cast.
-
 Cloudy: for scenes lit by an overcast sky. Compensates for a cool cast.
-
 Shade: for subjects in shade. Compensates for a cool, bluish cast.
The white balance is applied to all DxO ONE file types:
-
DNG (RAW and SuperRAW): the white balance is applied to and stored in the image’s metadata, which allows image processing software to interpret and display the correction correctly. In this case, the white balance is reversible and can be freely modified. The preset option selected when shooting can be replaced by another in post-production.
-
JPEG and video: the white balance is applied and cannot be changed. Image processing software will let you apply limited corrections to the white balance, but it will not be possible to completely modify it or replace it with another setting.
 Download page